Harness²: Improve AI Agents with Recursive Harnessing
In this tutorial, you will run a local demo without API credentials, inspect a concrete script improvement, and learn how to launch and evaluate a small model-backed experiment.
Before You Start
- Basic knowledge: Python virtual environments, Git, and terminal commands.
- Tools: Python 3.12 and uv.
- Benchmark environment: Linux. On macOS, use a Linux VM; on Windows, use WSL2 or a Linux VM.
Version and Verification
This tutorial was checked on October 26, 2026 against upstream commit 1cfe254.
- Local demo: Run successfully.
- Cloud benchmarks: Commands checked against the source code, but not executed for this tutorial.
1. Understand the Two Improvement Loops
A harness tells a model how to work. For example, an agent might have the right model and task description but use a script that drops negative amounts from a financial ledger. Improving the script changes the agent's behavior without training the model.
Harness² exposes eight editable components: system prompt, guardrails, memory, tool guidance, subagents, skills, scripts, and plugins. It improves them at two levels:
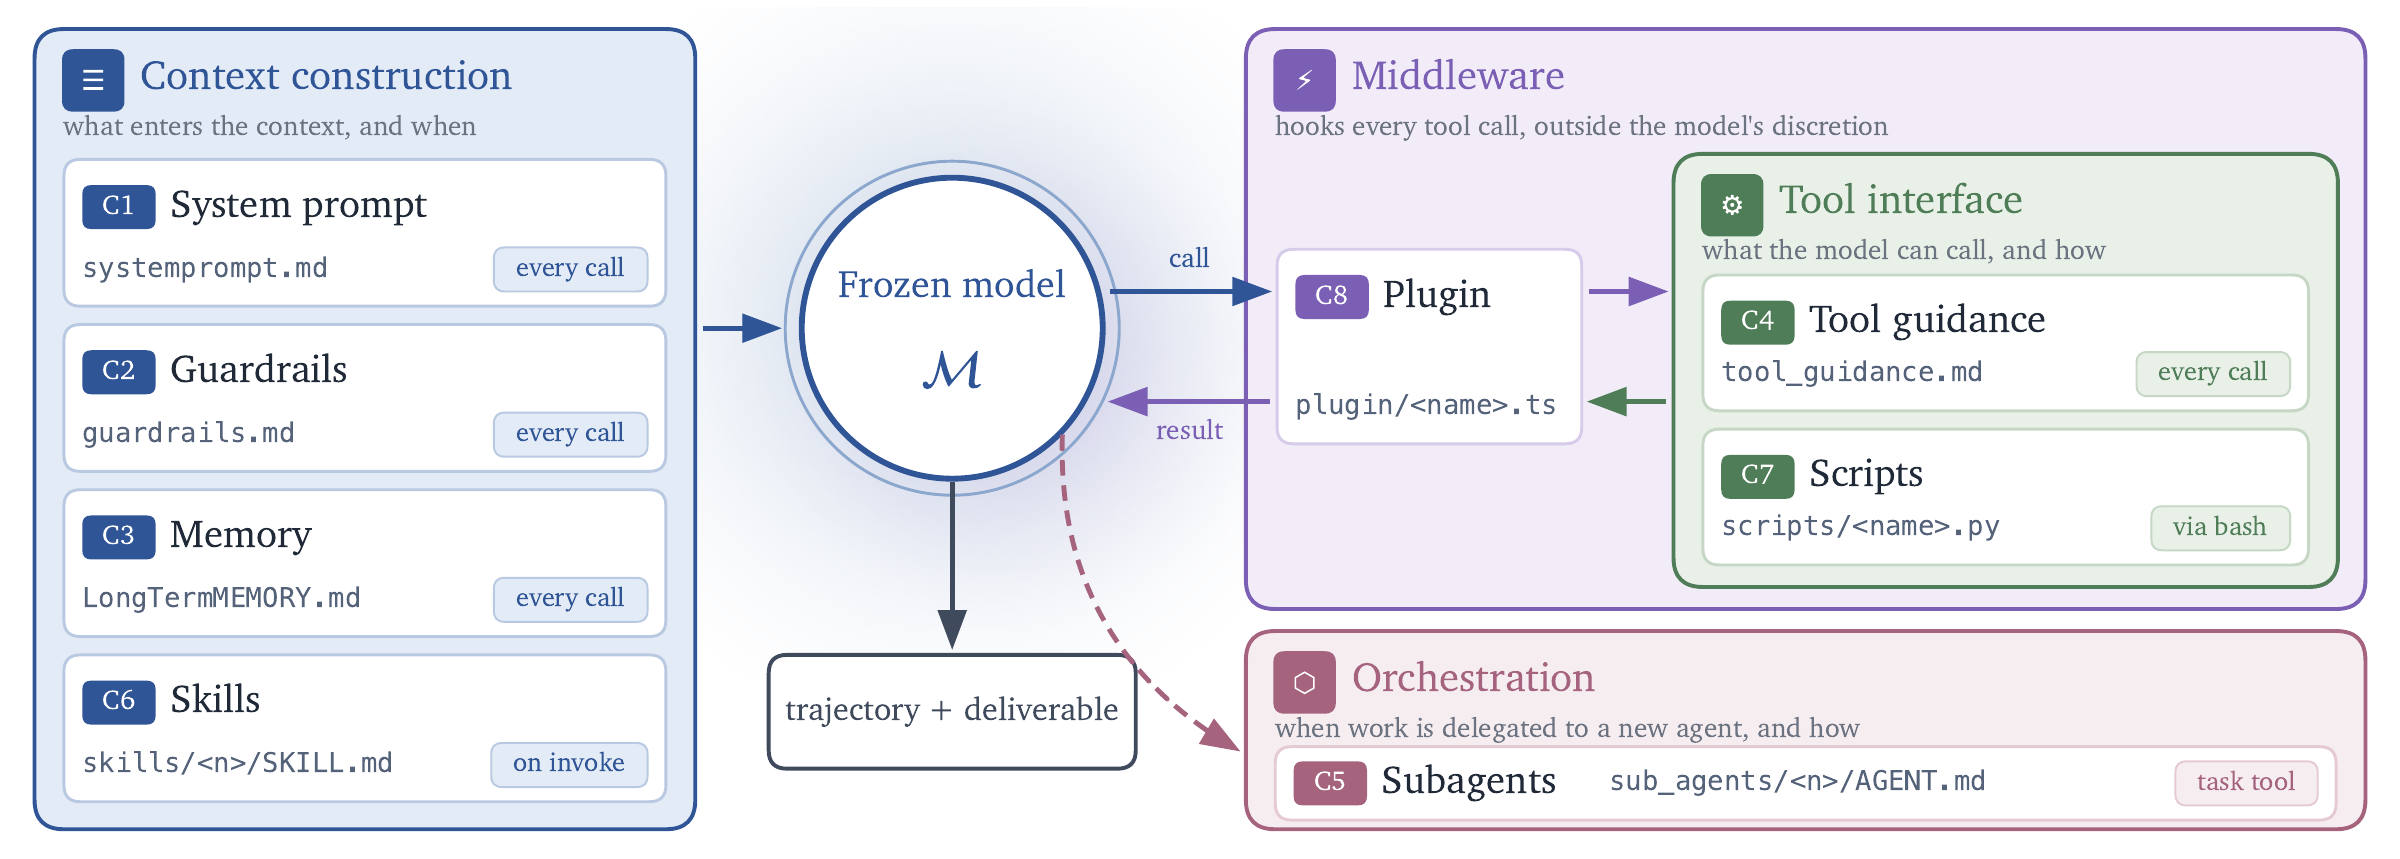 What can change? Context enters from the left; tools and orchestration sit on the right. The model in the center stays fixed. Original component diagram, Google Research.

| Loop | What happens | What carries forward |
|---|---|---|
| Task-level recursion | Propose edits, probe candidate harnesses on the current task, and compose a refinement from execution evidence | A refined harness for that task |
| Harnessing-level recursion | Reflect on the adopted harness and record evidence-supported lessons | A per-domain library that can inform later tasks |
The task-level workflow is Propose → Probe → Compose, followed by selection and reflection. Model-backed refinement uses behavioral contrasts without ground-truth feedback. Benchmark judging happens separately, after selection; it should not feed answers or grading criteria into the improvement loop. See the upstream experiment guide for the scheduling and evaluation design.
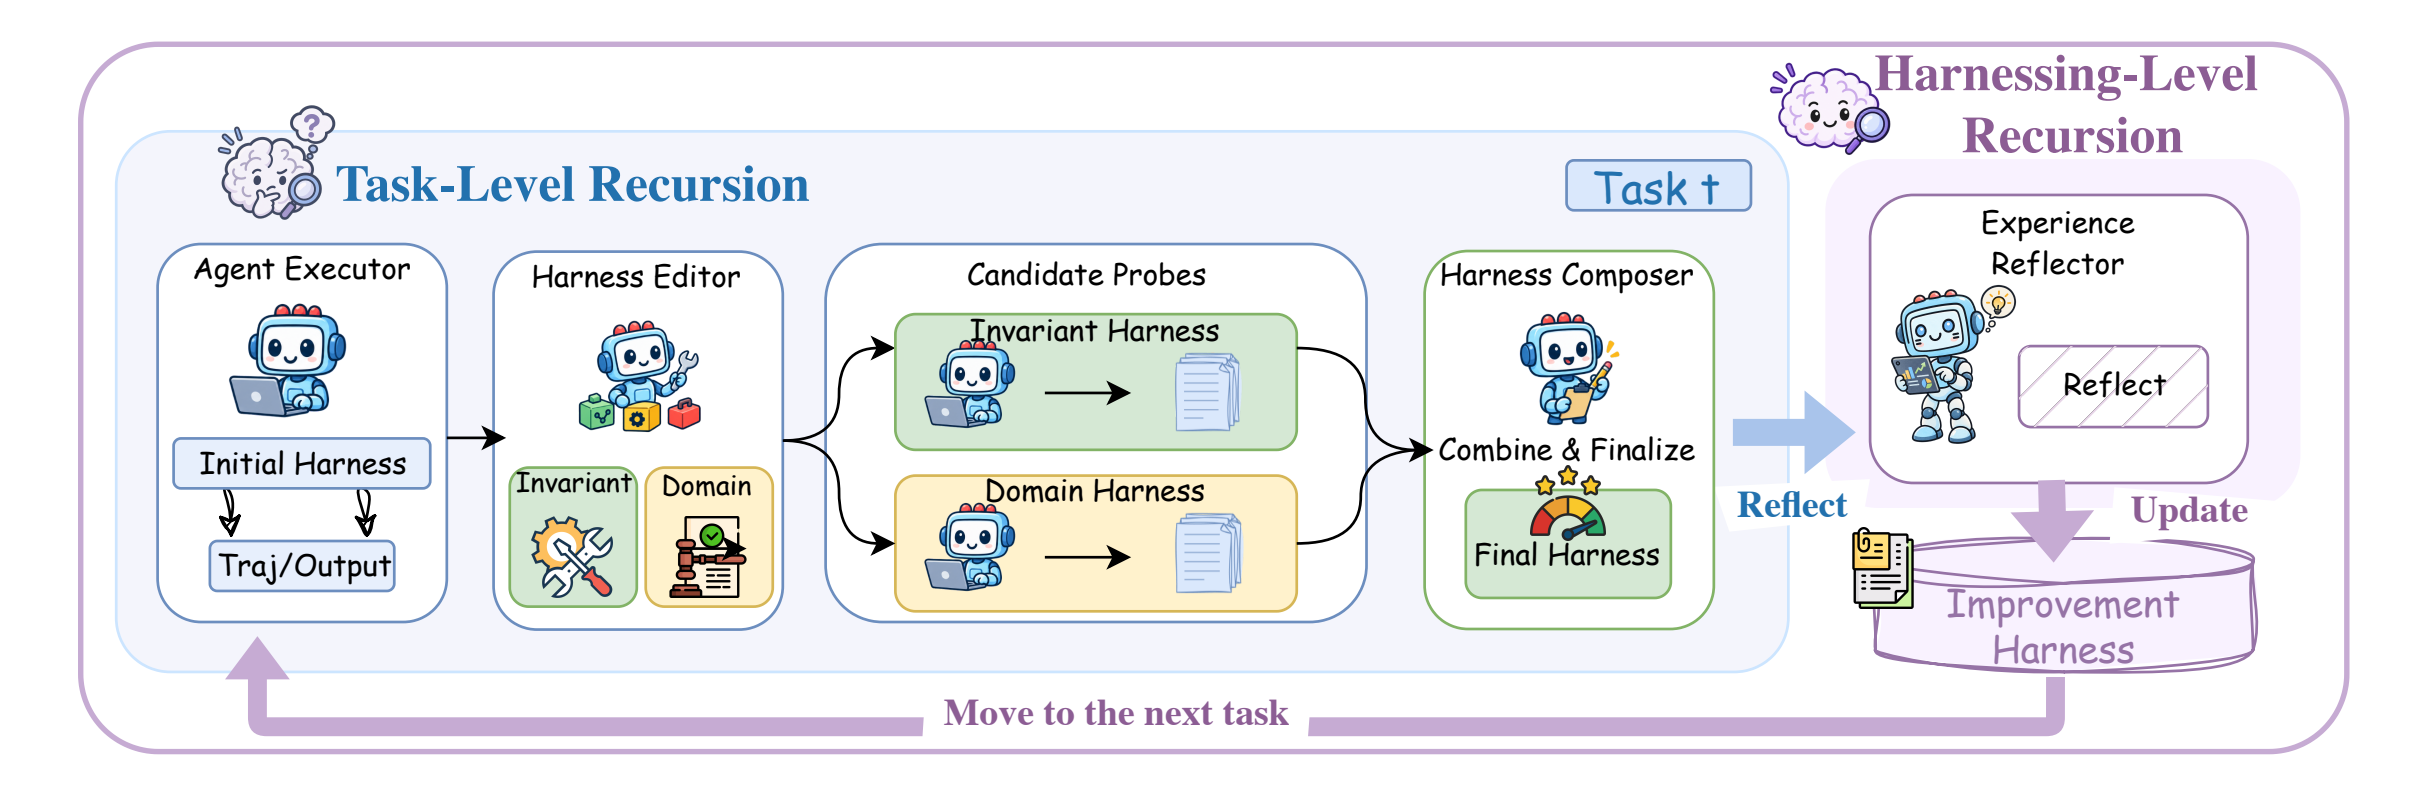 Read left to right for one task, then follow the purple return arrow to the next task. “Invariant” means general guidance; “domain” means guidance specific to that kind of work. Original pipeline diagram, Google Research.

2. Install from Source
Clone the repository into a separate project directory and create its environment:
git clone https://github.com/google-research/harness2.git
cd harness2

# Optional: use the exact source revision covered by this tutorial.
git checkout 1cfe254e8d25b15f37048c3730134686abe60335

uv venv --python 3.12 .venv
source .venv/bin/activate
uv pip install -e '.[render]'
The render extra installs spreadsheet and presentation dependencies used by document workflows. Keep this environment active, and run the remaining commands from the Harness² repository root.
Check that the command is available:
harness2-demo --helpYou do not need Node.js, Google Cloud credentials, or a benchmark download for the local demo.
3. Run the Demo Without Model Credentials
harness2-demo --output runs/demo --k 2The demo defaults to running both parallel and sequential recursion. It uses deterministic editors and real Python subprocess executions, so it exercises the improvement workflow without calling a model service.
On a fresh output directory, the final line should look like this, with your own absolute path:
Local demo: 2 tasks completed; 0 failed. /your/path/harness2/runs/demo/demo.jsonInspect the summary:
python -m json.tool runs/demo/demo.jsonThe fresh run used for this tutorial completed two tasks with zero failures, 28 executions, and 32 editor calls. The second task recorded one earlier library entry for each mode. These counts describe the demo configuration, not a general formula for model usage or cost.
Follow the Actual Improvement
The first task asks for the sum of these signed amounts:
100.25
-20.10
5.00
The base script incorrectly keeps only positive values:
total = sum((amount for amount in amounts if amount > 0), Decimal(0))The demo editor removes that filter:
total = sum((amount for amount in amounts), Decimal(0))Compare a base execution with a composed execution:
cat runs/demo/executions/demo-oc-agg2/ledger-1/base1/answer.txt
cat runs/demo/executions/demo-oc-agg2/ledger-1/agg1/answer.txt
Expected output for a fresh run at the pinned revision:
Total: 105.25
Total: 85.15
Here, oc identifies the OpenCode harness format and agg is the internal token for parallel recursion. The demo executes the script locally; it does not launch a model-backed OpenCode session.
The correct signed sum is 85.15. This illustrates a harness edit that fixes observable behavior, followed by a reusable lesson about preserving both signs in ledger calculations. The demo's scripted selector computes the expected sum from the input ledger; it is a workflow demonstration, not evidence that a model independently discovered the fix. You can inspect the demo implementation to see the scripted edits and selection.
Explore the Saved Evidence
find runs/demo/runs -name summary.json
find runs/demo/library -type f
The most useful directories are:
| Path | What to inspect |
|---|---|
runs/demo/base/ | Starting harness, including scripts/summarize.py |
runs/demo/sources/ | Input ledgers |
runs/demo/executions/ | Each execution's answer.txt and trajectory.md |
runs/demo/runs/ | Task summaries and refinement state |
runs/demo/library/ | Adopted harnesses and reflection evidence for later tasks |
4. Choose a Recursion Budget
--k controls the task-level recursion budget. It is not a limit on the number of API calls.
| Setting | Behavior |
|---|---|
--k 1 | One Propose–Probe–Compose step |
--k 2 --mode parallel | Two general candidates and two domain-specific candidates, followed by two compositions using the candidate pool and evidence |
--k 2 --mode sequential | Two successive refinement steps that carry the refined harness and accumulated evidence forward |
Both modes begin with k reference executions of the base harness. Parallel recursion explores alternatives; sequential recursion builds on earlier refinements. Increasing either budget adds execution and improvement work.
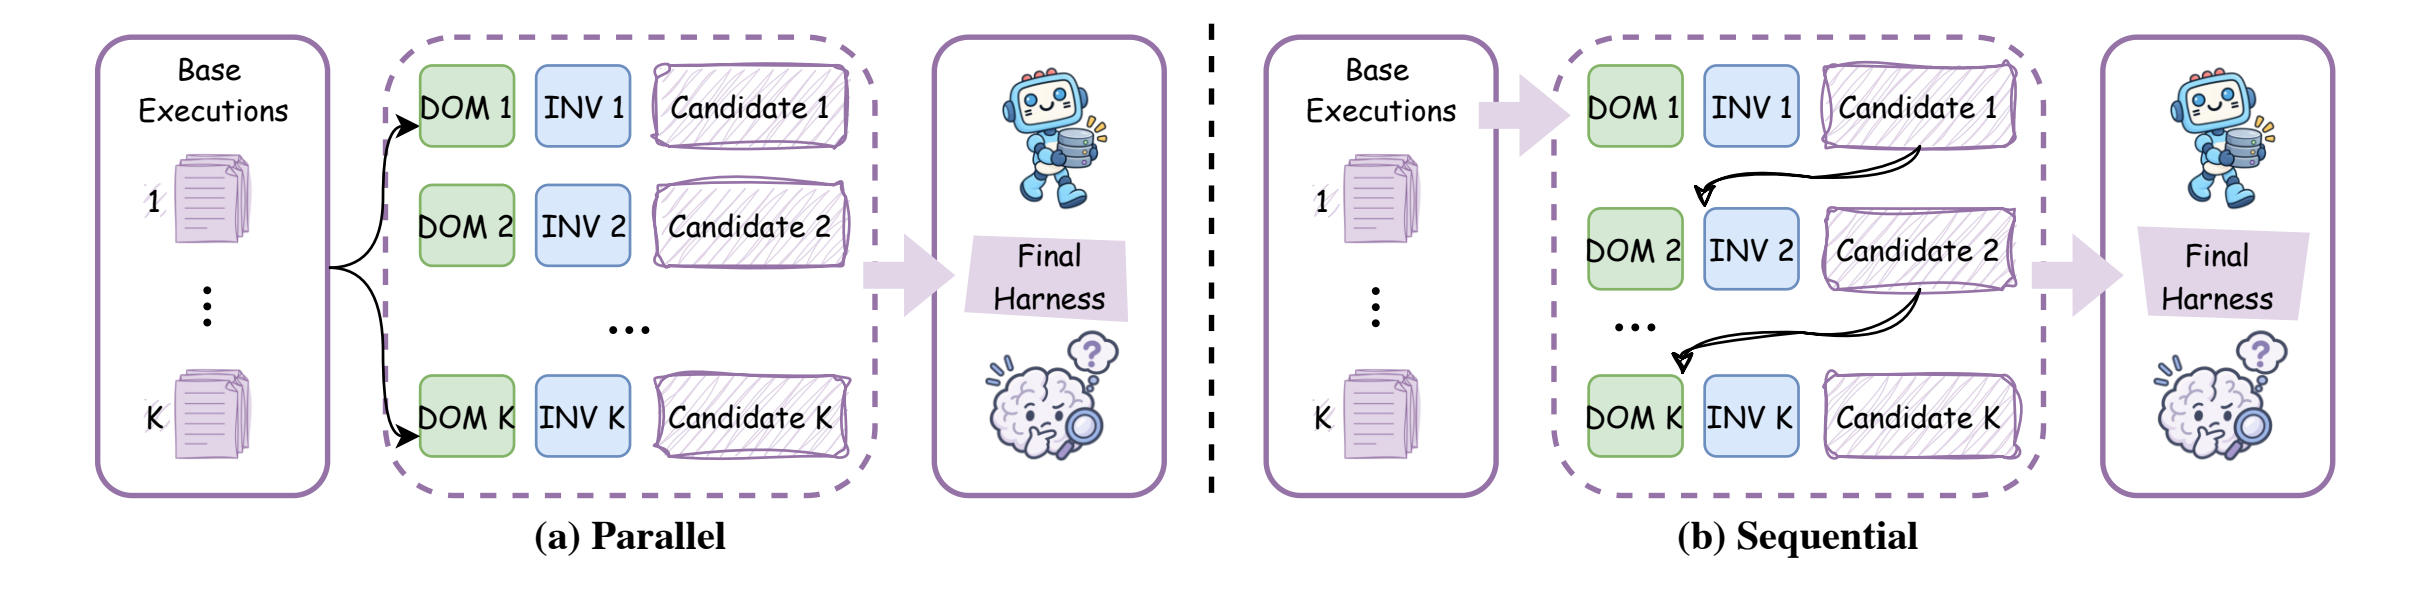 Left: explore several alternatives from the base evidence. Right: carry refinements through a sequence. DOM denotes domain-specific edits; INV denotes general edits. Original recursion diagram, Google Research.

Try the modes separately using different output directories:
harness2-demo --output runs/demo-parallel --k 2 --mode parallel
harness2-demo --output runs/demo-sequential --k 2 --mode sequential
Within a domain, tasks run in order and can read only earlier library entries. Different domains can run concurrently in benchmark experiments.
5. Prepare a Model-Backed Benchmark
The remaining steps call cloud models and incur API costs. Start with one domain, one task, and --k 1.
The upstream setup guide requires Linux, Python 3.12, Node.js 20 or newer, and the Google Cloud CLI for the Vertex AI configuration. Install Node.js and the Google Cloud CLI using their official installation instructions, then check:
node --version
gcloud --version
For the LAB legal-work benchmark, also install Pandoc and Poppler. On Debian or Ubuntu:
sudo apt-get update
sudo apt-get install -y git curl unzip ca-certificates pandoc poppler-utils
Configure the Models
Create .env in the Harness² repository root. Upstream documentation references .env.example, but that file is absent from the pinned revision, so create the file directly with this template:
GOOGLE_CLOUD_PROJECT=your-google-cloud-project
GOOGLE_CLOUD_LOCATION=global
HARNESS2_SOLVER_MODEL=google-vertex/YOUR_EXECUTOR_MODEL_ID
HARNESS2_IMPROVER_MODEL=google-vertex/YOUR_IMPROVER_MODEL_ID
HARNESS2_JUDGE_MODEL=YOUR_JUDGE_MODEL_ID
Replace every placeholder with a project and Vertex model ID your account can access. For this walkthrough, choose supported Gemini models. Solver and improver settings include the google-vertex/ provider prefix; the judge setting uses the bare model ID. The improver defaults to the solver if omitted. Shell environment variables override values in .env.
Authenticate with Application Default Credentials:
gcloud auth application-default loginInstall only LAB and check its configuration:
harness2-setup lab --dry-run
harness2-setup lab
harness2-check --bench lab
Setup downloads pinned upstream dependencies and creates a separate benchmark environment. Keep the main Harness² environment active; the runner selects the benchmark interpreter automatically. The check makes no model calls and does not prove that your account can invoke every configured model.
Keep Evaluation Evidence Separate
The release permits unrestricted executor network access. Public benchmark repositories can expose answers or rubrics, which can contaminate scores. After downloading dependencies, apply executor network restrictions before evaluation, following the upstream web-access guidance. It calls for blocking benchmark-data hosts such as Hugging Face and benchmark repositories on GitHub while retaining the model access needed for the run.
Record the network policy alongside your results. A completed run with access to public grading material does not establish an uncontaminated benchmark result.
6. Run, Judge, and Report One LAB Task
Choose a separate output root for this experiment, then preview the task selection:
export HARNESS2_RUNS_DIR=runs/lab-first-task

harness2 --bench lab --k 1 --mode parallel \
  --only-domains antitrust-competition --max-tasks 1 --dry-run
--max-tasks caps tasks per domain. Selecting one domain is what makes this a one-task run.
When the preview shows the intended task, execute it and evaluate its selected result:
harness2 --bench lab --k 1 --mode parallel \
  --only-domains antitrust-competition --max-tasks 1

harness2-judge --bench lab --k 1 --mode parallel
harness2-report --bench lab --k 1 --mode parallel
Run, judge, and report must agree on the benchmark, executor, k, mode, seed, and WorkBuddy subset where applicable. The judge and report read the existing run namespace; they do not need the refinement-only domain and task-limit flags. Keep the same HARNESS2_RUNS_DIR exported in the terminal for all three commands.
LAB reports Partial, the fraction of grading criteria passed, and All-pass, whether all criteria passed. Failed evaluations remain unscored; inspect missing results rather than treating them as zero or silently excluding them.
To score the reference executions for comparison:
harness2-judge --bench lab --k 1 --mode parallel --basesThis writes base_judged.json beside judged.json. The report command covers refined results only, so inspect both files when comparing against the base harness. A one-task experiment verifies the workflow; it cannot establish a reliable general improvement.
7. Resume and Compare Experiments
Repeat the same command with the same settings and output root to resume. When changing models or task selection, use a new HARNESS2_RUNS_DIR; use separate roots for budget and mode comparisons as well.
For a deeper sequential experiment, keep the models, selected task, and network policy fixed:
export HARNESS2_RUNS_DIR=runs/lab-sequential-k2

harness2 --bench lab --k 2 --mode sequential \
  --only-domains antitrust-competition --max-tasks 1
harness2-judge --bench lab --k 2 --mode sequential
harness2-report --bench lab --k 2 --mode sequential
Before comparing results, inspect selected deliverables, trajectories, adopted harnesses, fallback records, and grading completeness. The reported improver spend is not the entire experiment bill: executor and judge calls also consume resources. If using --seed, keep it identical across all commands; it controls task ordering, not model sampling.
Troubleshooting
| Symptom | What to check |
|---|---|
harness2-demo: command not found | Activate .venv and repeat the editable install from the source root. |
cp .env.example .env fails | The pinned release omits that file. Create .env using the template above. |
| Configuration looks correct but uses an old model | Check exported shell variables; they override .env. |
| Checks pass but a model call fails | Verify model access, the provider prefix, project permissions, and quota. Preflight does not invoke models. |
LAB judging logs 429 RESOURCE_EXHAUSTED | Review quota and rerun the same judge command later. Inspect judge.log for the affected task. |
| Report says there is nothing to report | Finish judging and check that the output root, mode, budget, executor, and seed match. |
| Resume rejects changed settings | Use a new output root for the changed experiment. |
Where to Go Next
The release also supports JobBench for professional tasks and WorkBuddy-Bench for office, web, and code tasks. WorkBuddy requires Docker and an explicit subset for run, check, judge, and report commands. Review each benchmark's requirements and license in the benchmark guide before downloading it.
For your own task domain, begin by identifying a repeatable failure, the harness component responsible, and the evidence that would distinguish a useful change. The ledger example is a compact pattern: preserve the inputs, compare executions, inspect the adopted edit, and carry forward only lessons supported by those observations.