Nosana x Mastra: Building Intelligent AI Agents

This tutorial guides you through building intelligent AI agents using the Mastra framework and utilizing open-source models from Nosana's decentralized GPU network.

Understanding the Core Technologies
What is Nosana?
Nosana is a decentralized GPU marketplace built on Solana that connects GPU owners with AI developers. By leveraging underutilized consumer GPUs globally, Nosana provides cost-effective AI inference compute power at up to 85% lower costs compared to traditional cloud providers. The network processes AI workloads through Docker containers, offering dynamic pricing and seamless integration for production deployments.Key features include:
- Decentralized Infrastructure: Built on Solana blockchain with peer-to-peer GPU sharing
- AI Inference Focus: Optimized specifically for running trained AI models
- Docker-Ready: Deploy containerized applications with any AI framework
- Performance Validation: All GPUs undergo rigorous benchmarking before deployment
What is Mastra?
Mastra is an open-source TypeScript framework designed for building production-ready AI agents and workflows. Created by the team behind Gatsby, Mastra provides a comprehensive toolkit with agents, workflows, memory systems, tool integration, and built-in observability. The framework supports the Model Context Protocol (MCP) for seamless tool integration and includes a local playground for testing.
Core primitives:
- Agents: Autonomous systems that use LLMs and tools to solve tasks
- Workflows: State-machine based orchestration with suspend/resume capabilities
- Tools: Type-safe functions that agents execute to interact with external systems
- Memory: Persistent conversation history and semantic recall
- MCP Integration: Universal plugin system for connecting to external services
Project Setup
Prerequisites
Ensure you have the following installed:
- Node.js 18+ and npm/pnpm
- Git for version control
- Nosana account with pre-loaded credits (to deploy and access the GPT-OSS model)
Initialize Your Mastra Project
Create a new Mastra project using the CLI:
npm create mastra@latest my-agent-project
During setup, you'll see the following prompts:
Where should we create the Mastra files? (default: src/)
│  src/
│
◇  Select a default provider:
│  OpenAI
│
◇  Enter your OpenAI API key?
│  Skip for now
│
◇  Make your IDE into a Mastra expert? (Installs Mastra's MCP server)
│  Skip for now
Open your project with your favorite IDE:
cd my-agent-project
Deploy GPT-OSS 20B Model on Nosana
Before configuring your agent, you need to deploy the GPT-OSS 20B model on Nosana's infrastructure:
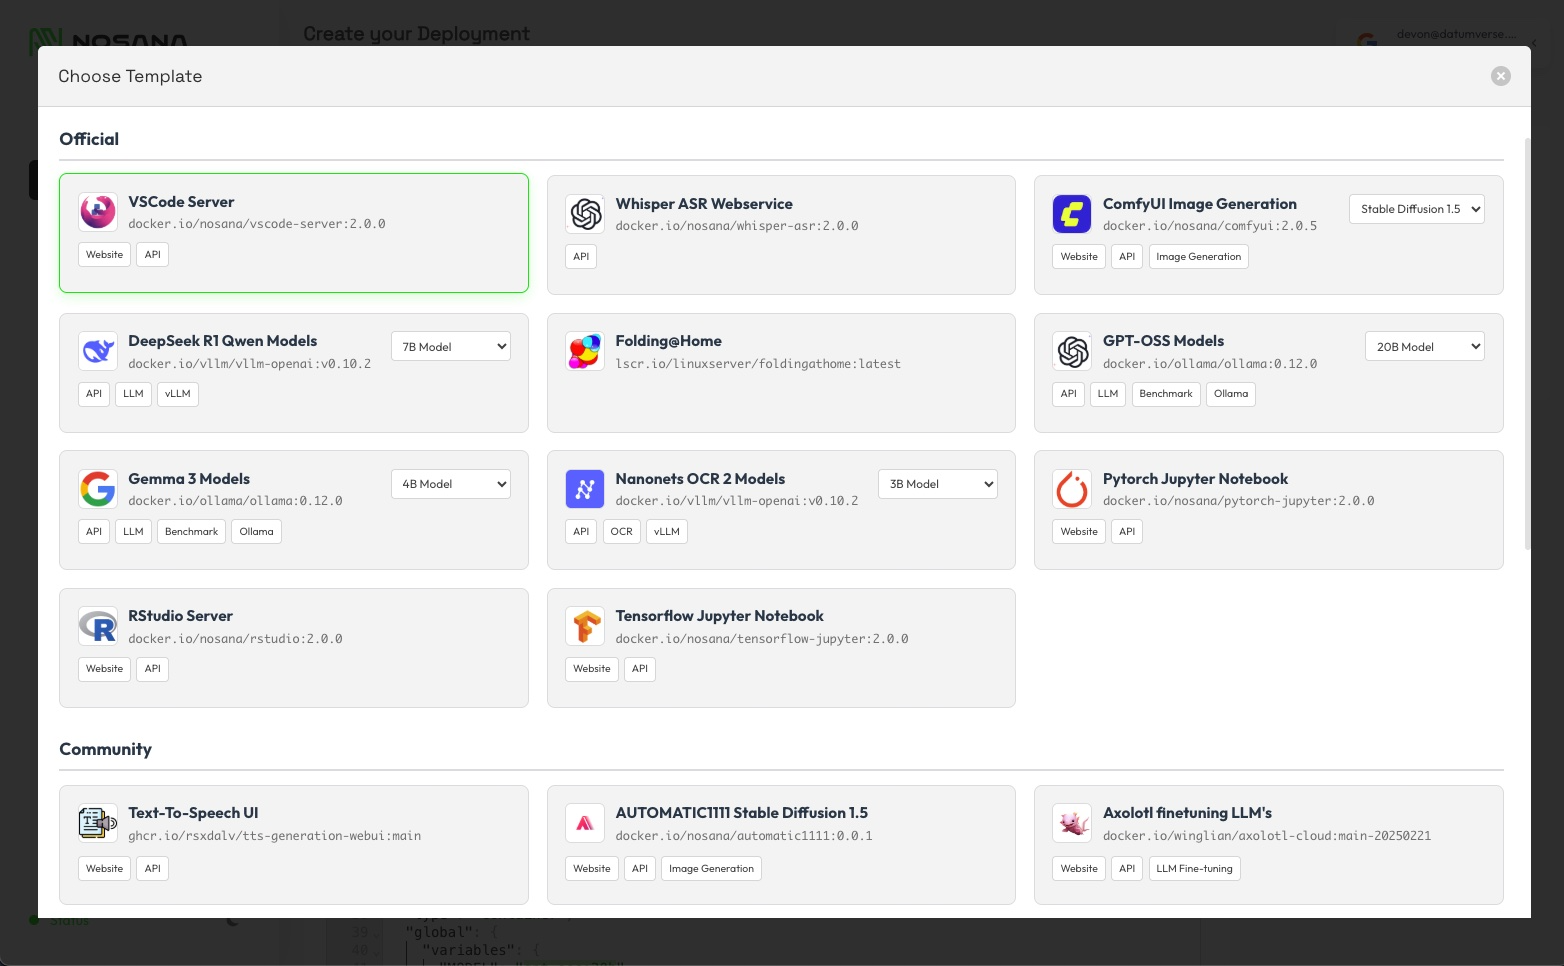
- Navigate to the Nosana Dashboard
- Log in with your Nosana account
- Go to the Inference section
- Click Deploy New Model
- Select GPT-OSS 20B from the available model templates
- Choose your preferred GPU configuration (recommended: NVIDIA RTX 4090 or higher)
- Click Deploy and wait for the model to be provisioned (usually takes 2-5 minutes)
- Once deployed, copy the API endpoint URL - it will look like:
https://YOUR_NOSANA_URL_ID.node.k8s.prd.nos.ciConfigure Environment Variables
Make a copy of .env.example, rename it to .env, and configure your environment variables with the Nosana endpoint:
# For Nosana Ollama Endpoint with GPT-OSS 20B
OLLAMA_API_URL=https://YOUR_NOSANA_URL_ID.node.k8s.prd.nos.ci/api
MODEL_NAME_AT_ENDPOINT=gpt-oss:20b
Replace https://YOUR_NOSANA_URL_ID.node.k8s.prd.nos.ci with your actual Nosana API endpoint URL after you click Open Service (just copy paste the page link).
/api at the end of the Nosana URL, otherwise your model endpoint won't work correctly.
Since Mastra doesn't have Ollama as a default template, you can use the following prompt with an AI assistant to help configure your project to use the Ollama model:
I need to configure my Mastra project to use Ollama instead of OpenAI.
Please help me:

1. Update the agent configuration files to use Ollama with the following
   settings:
   - API URL: process.env.OLLAMA_API_URL
   - Model: process.env.MODEL_NAME_AT_ENDPOINT
2. Update any imports and model initialization to use the Ollama provider
   from @ai-sdk/ollama
3. Ensure all agents in the project are configured to use this Ollama setup
Start Your Mastra Project
After you've set up your project, simply run the following command to start everything:
pnpm run dev
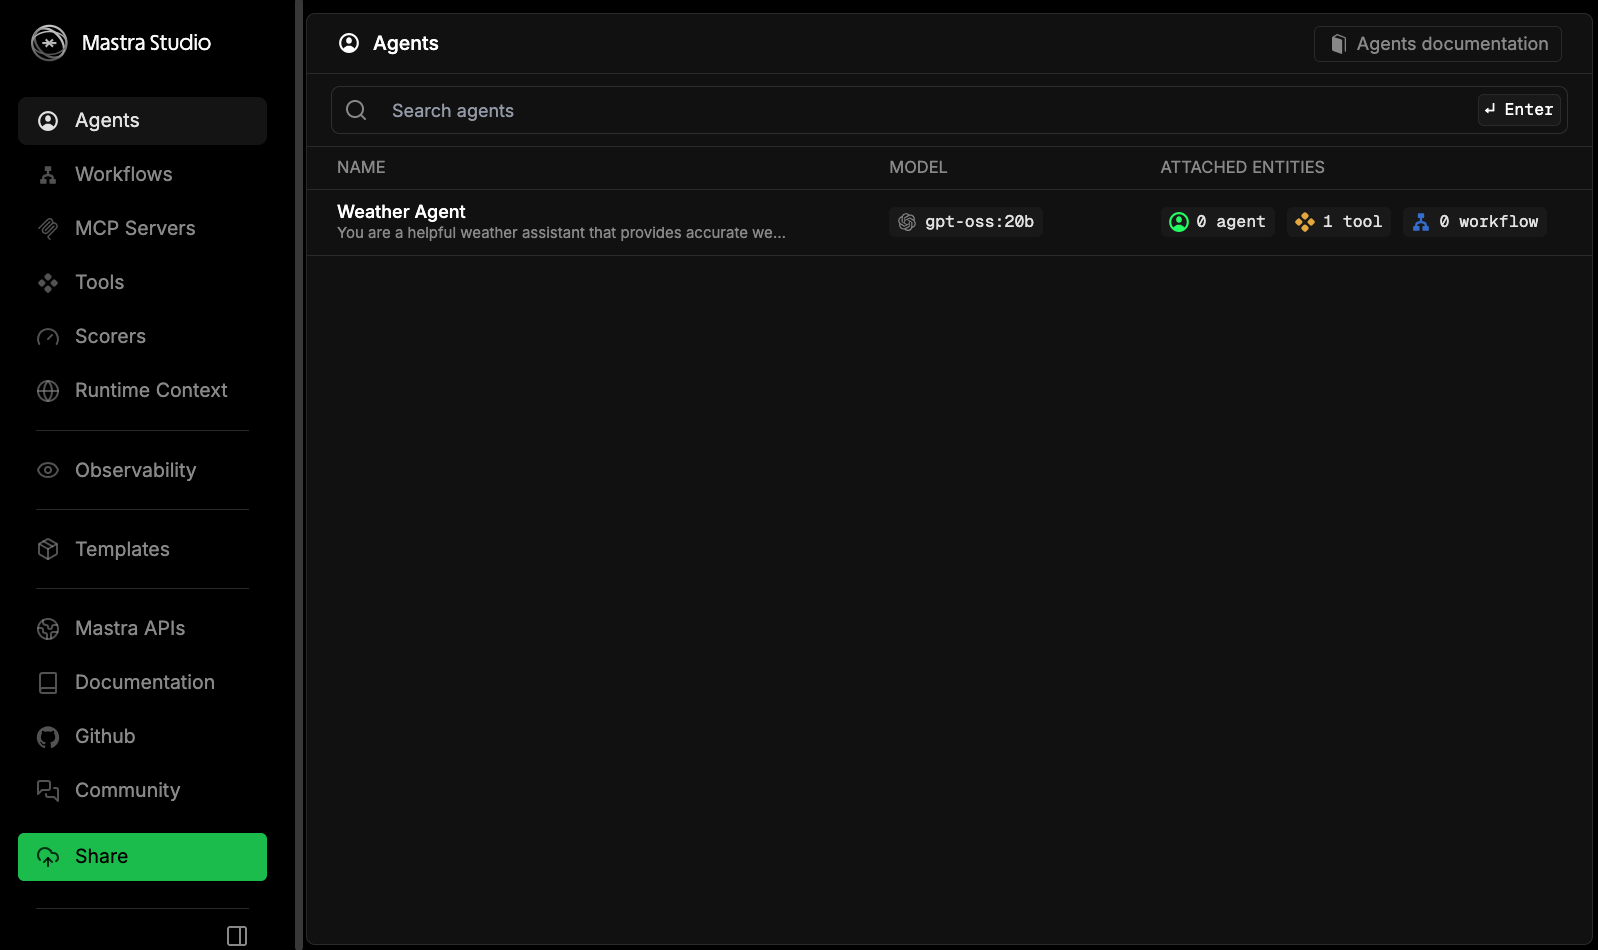
You should see output like this:
...
 mastra  0.17.7 ready in XXXX ms

│ Playground: http://localhost:4111/
│ API:        http://localhost:4111/api
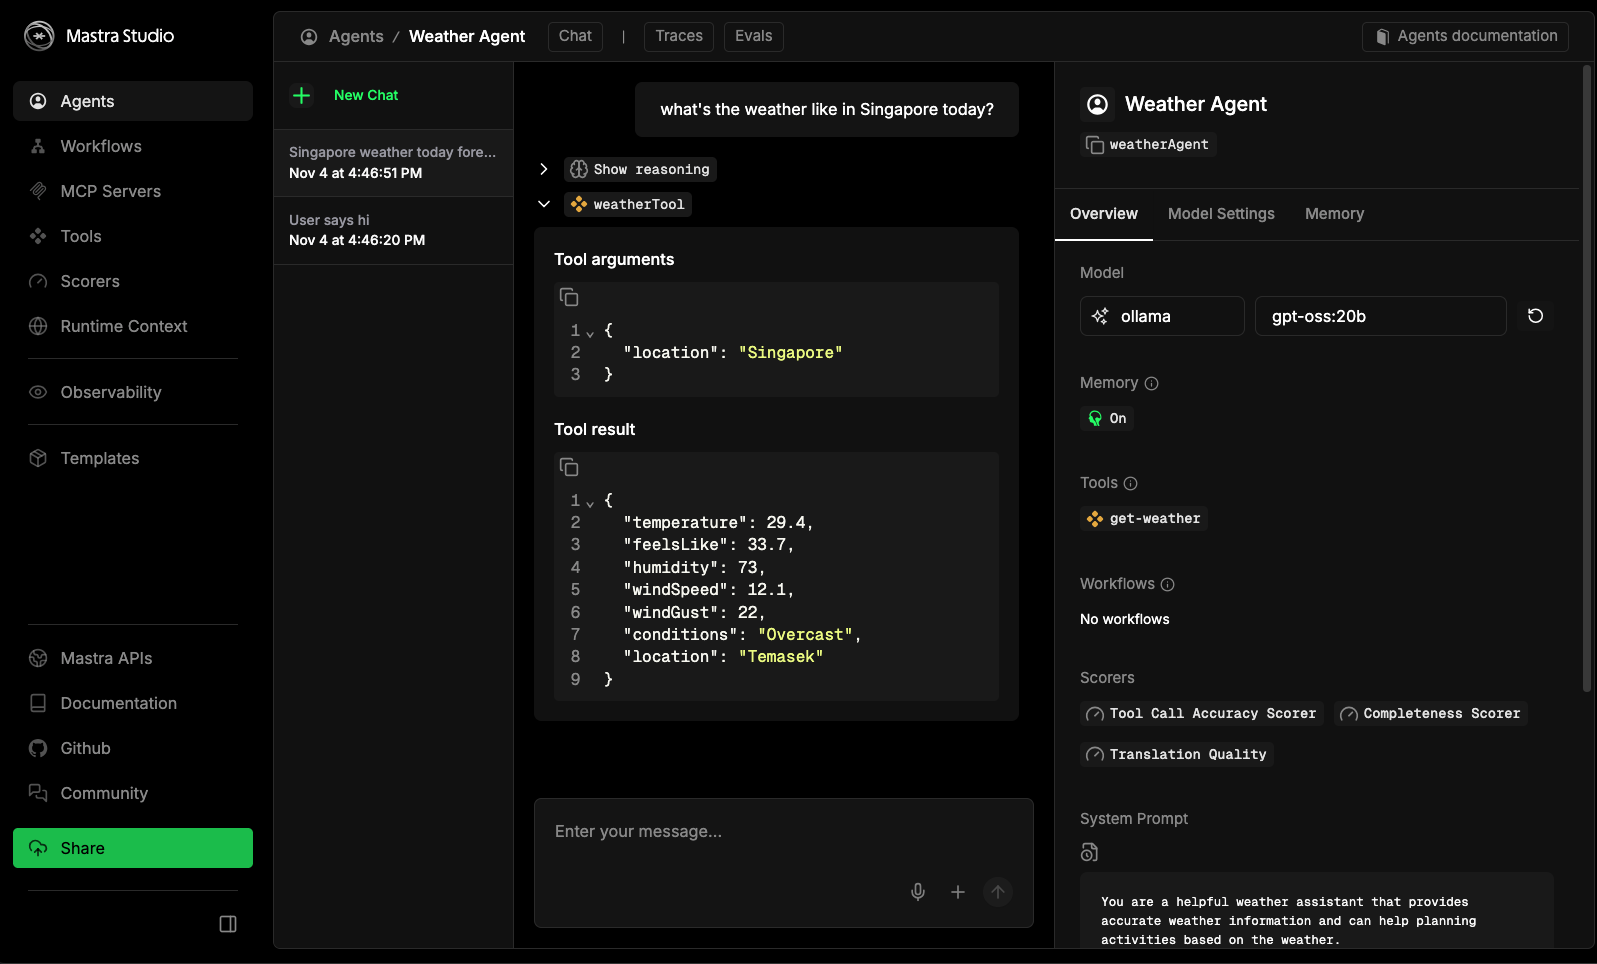
Click the Playground link shown in your console output (http://localhost:4111/) , you should see gtp-oss:20b listed as the model for your default weather agent.
If you ask the model as question like what's the weather like in Singapore today?, it should should you the tool response of the weather condition in Singapore today.
Building Your First Agent
Creating a Custom Agent
Agents in Mastra are autonomous systems that combine LLMs with tools to accomplish tasks. Create a new agent file:
// src/mastra/agents/assistant.ts
import { Agent } from '@mastra/core/agent';
import { openai } from '@ai-sdk/openai';

export const assistantAgent = new Agent({
  name: 'Personal Assistant',
  instructions: `You are a helpful personal assistant that can:
    - Answer questions about various topics
    - Help with task management
    - Provide recommendations

    Always be concise and accurate in your responses.
    Use available tools when needed to accomplish tasks.`,
  model: openai('gpt-4o-mini'),
  tools: {},
});
Implementing Custom Tools
Tools extend agent capabilities by connecting to external APIs and services. Create a tool for fetching data:
// src/mastra/tools/index.ts
import { createTool } from '@mastra/core';
import { z } from 'zod';

export const searchTool = createTool({
  id: 'web-search',
  description: 'Search the web for information on a given topic',
  inputSchema: z.object({
    query: z.string().describe('The search query'),
  }),
  outputSchema: z.object({
    results: z.string().describe('Search results summary'),
  }),
  execute: async ({ context }) => {
    const { query } = context;
    const response = await fetch(
      `https://api.example.com/search?q=${encodeURIComponent(query)}`
    );
    const data = await response.json();

    return {
      results: data.summary || 'No results found',
    };
  },
});

export const calculatorTool = createTool({
  id: 'calculator',
  description: 'Perform mathematical calculations',
  inputSchema: z.object({
    expression: z.string().describe('Mathematical expression to evaluate'),
  }),
  outputSchema: z.object({
    result: z.number(),
  }),
  execute: async ({ context }) => {
    const { expression } = context;
    try {
      const result = eval(expression);
      return { result: parseFloat(result) };
    } catch (error) {
      throw new Error('Invalid mathematical expression');
    }
  },
});
Add tools to your agent:
import { assistantAgent } from './agents/assistant';
import { searchTool, calculatorTool } from './tools';

export const enhancedAgent = new Agent({
  name: 'Enhanced Assistant',
  instructions: assistantAgent.instructions,
  model: openai('gpt-4o-mini'),
  tools: { searchTool, calculatorTool },
});
Creating a Research Workflow
Workflows orchestrate complex sequences of agent and tool executions with control flow logic.
// src/mastra/workflows/research.ts
import { Step, Workflow, createWorkflow } from '@mastra/core/workflows';
import { z } from 'zod';
import { researchAgent } from '../agents/research';
import { writerAgent } from '../agents/writer';

const researchStep = new Step({
  id: 'research',
  execute: async ({ context }) => {
    const { topic } = context.triggerData;

    const result = await researchAgent.generate(
      `Research comprehensive information about: ${topic}`
    );

    return { research: result.text };
  },
});

const writeStep = new Step({
  id: 'write',
  execute: async ({ context }) => {
    const research = context.getStepResult('research')?.research;

    const result = await writerAgent.generate(
      `Write a detailed article using this research: ${research}`
    );

    return { article: result.text };
  },
});

export const researchWorkflow = createWorkflow({
  name: 'research-and-write',
  triggerSchema: z.object({
    topic: z.string(),
  }),
})
  .then(researchStep)
  .then(writeStep)
  .commit();
Execute workflows programmatically:
const result = await researchWorkflow.execute({
  triggerData: { topic: 'Quantum Computing' },
});

console.log(result.results.write.article);
Adding Agent Memory
Memory enables agents to maintain context across conversations and recall previous interactions.
import { Agent } from '@mastra/core/agent';
import { Memory } from '@mastra/memory';

export const memoryAgent = new Agent({
  name: 'Memory-Enabled Assistant',
  instructions: 'You remember past conversations and provide personalized responses.',
  model: openai('gpt-4o-mini'),
  memory: new Memory(),
  tools: {},
});
Use memory in conversations:
const response = await memoryAgent.generate(
  'My name is Alex and I work in finance',
  {
    memory: {
      thread: 'user-123',
      resourceid: 'conversation',
    },
  }
);

const followUp = await memoryAgent.generate(
  'What did I say my profession was?',
  {
    memory: {
      thread: 'user-123',
      resourceid: 'conversation',
    },
  }
);
Testing and Validation
Using the Mastra Playground
The Mastra Playground provides interactive testing capabilities:
- Navigate to
http://localhost:4111 - Test agents with different prompts
- Inspect tool calls and execution traces
- Debug agent decision-making processes
- Monitor workflow execution steps
Implementing Evals
Evals help measure and track agent performance:
import { createEval } from '@mastra/core';

const accuracyEval = createEval({
  name: 'response-accuracy',
  evaluate: async ({ output, expected }) => {
    const score = calculateSimilarity(output, expected);
    return {
      score,
      passed: score > 0.8,
      metadata: { output, expected },
    };
  },
});
Best Practices and Tips
Agent Design
- Write clear, detailed system prompts that define roles and capabilities
- Start with simple agents and gradually add complexity
- Test tools in isolation before integrating them
Tool Implementation
- Provide descriptive tool descriptions for better LLM understanding
- Implement proper error handling in tool execute functions
- Use Zod schemas for type-safe input/output validation
Performance Optimization
- Use streaming responses for real-time user feedback
- Implement caching for expensive operations
- Limit maxSteps to prevent infinite loops
- Monitor resource usage and optimize for efficiency
- Implement proper logging and observability
Conclusion
You have learned to build intelligent AI agents using the Mastra framework with open-source models from Nosana. This tutorial covered setting up your development environment, creating custom agents, implementing tools and workflows, adding memory capabilities, and testing everything locally using the Mastra Playground.
Key takeaways include:
- Understanding Mastra's core primitives: agents, tools, workflows, and memory
- Connecting to Nosana's open-source models via Ollama
- Building custom agents with specific capabilities
- Creating type-safe tools with Zod schemas
- Implementing multi-step workflows
- Testing and validating agents using the playground
Next Steps
To continue your journey with Mastra:
- Experiment with different Nosana models and configurations
- Build more complex workflows and integrations