Gradio: From Interface to Chatbots

Welcome to this tutorial on Gradio! Gradio is a powerful open-source Python library that makes it incredibly simple to build and share interactive web apps for your machine learning models, APIs, or arbitrary Python functions.
In this notebook, we'll explore the core concepts of Gradio to get you up and running quickly. We will cover:
- Setup: Installing Gradio and loading API keys from a
.envfile. gr.Interface: The primary, high-level class for creating a UI from a function.- Components: The various input/output elements like text boxes, sliders, and image fields.
gr.Blocks: A low-level API for creating more complex and custom layouts.gr.ChatInterface: A specialized, easy-to-use interface for building chatbots.- Sharing: How to generate a public link for your app with a single command.
1. Setup
First, let's install gradio and python-dotenv, which we'll use to manage API keys securely.
# Uncomment the following line to install necessary packages
!pip install -q gradio python-dotenv -q
import gradio as gr
import os
from dotenv import load_dotenv
# Load environment variables from .env file
load_dotenv()
openai_api_key = os.getenv("OPENAI_API_KEY")
print("API keys loaded!")API keys loaded!
2. The gr.Interface Class: The Core of Gradio
The easiest way to create a UI is with the gr.Interface class. It's designed to wrap any Python function with an interactive interface. It requires three core arguments:
fn: The function to wrap.inputs: The input component(s) for the user (e.g.,"text","image","slider").outputs: The output component(s) to display the result.
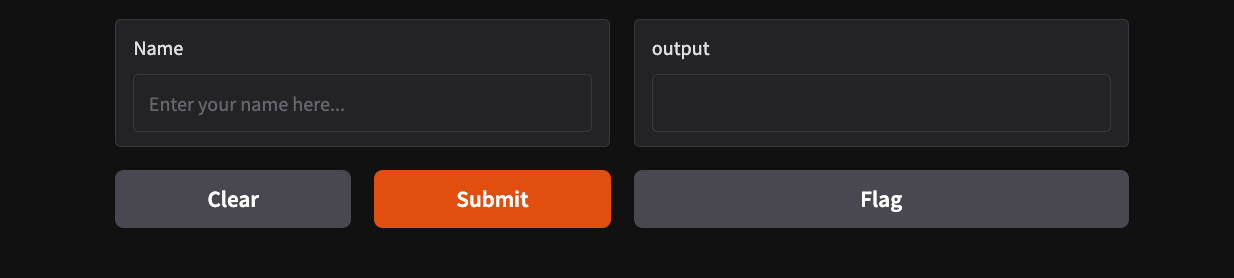
Let's start with a simple "Hello World".
def greet(name):
    return f"Hello, {name}!"

demo = gr.Interface(
    fn=greet,
    inputs=gr.Textbox(label="Name", placeholder="Enter your name here..."),
    outputs="text"
)

demo.launch()
* Running on local URL: http://127.0.0.1:7861 * To create a public link, set `share=True` in `launch()`.
Created dataset file at: .gradio/flagged/dataset1.csv
Handling Multiple Inputs and Outputs
Gradio can handle functions with multiple inputs and outputs. Simply provide a list of components to the inputs and outputs arguments. The order matters!
def calculate(num1, num2, operation):
    if operation == "add":
        result = num1 + num2
    elif operation == "subtract":
        result = num1 - num2
    elif operation == "multiply":
        result = num1 * num2
    elif operation == "divide":
        if num2 == 0:
            return "Error", "Cannot divide by zero"
        result = num1 / num2
    return result, f"Performed {operation}."

demo = gr.Interface(
    fn=calculate,
    inputs=[
        gr.Number(label="Number 1"),
        gr.Number(label="Number 2"),
        gr.Dropdown(["add", "subtract", "multiply", "divide"], label="Operation")
    ],
    outputs=[
        gr.Textbox(label="Result"),
        gr.Textbox(label="Status")
    ],
    title="Simple Calculator",
    description="A simple calculator to demonstrate multiple inputs and outputs.",
    examples=[[5, 3, "add"], [10, 2, "divide"]]
)

demo.launch()
* Running on local URL: http://127.0.0.1:7862 * To create a public link, set `share=True` in `launch()`.
3. gr.Blocks: For Custom Layouts
When you need more control over the UI layout, gr.Blocks is the tool to use. It allows you to arrange components with rows, columns, and tabs, and define more complex event-driven interactions.
Here, we'll create a simple app with two tabs. Notice how the button's .click() method wires up the components.
import numpy as np

def flip_image(img):
    return np.fliplr(img)

def greet_user(name):
    return f"How are you, {name}?"

with gr.Blocks(theme=gr.themes.Soft()) as demo:
    gr.Markdown("# Custom UI with Blocks")
    with gr.Tabs():
        with gr.TabItem("Image Flipper"):
            with gr.Row():
                image_input = gr.Image()
                image_output = gr.Image()
            image_button = gr.Button("Flip Image")

        with gr.TabItem("Greeter"):
            name_input = gr.Textbox(label="Name")
            greeting_output = gr.Textbox(label="Greeting")
            greet_button = gr.Button("Greet")

    # Define interactions
    image_button.click(fn=flip_image, inputs=image_input, outputs=image_output)
    greet_button.click(fn=greet_user, inputs=name_input, outputs=greeting_output)

demo.launch()
* Running on local URL: http://127.0.0.1:7863 * To create a public link, set `share=True` in `launch()`.
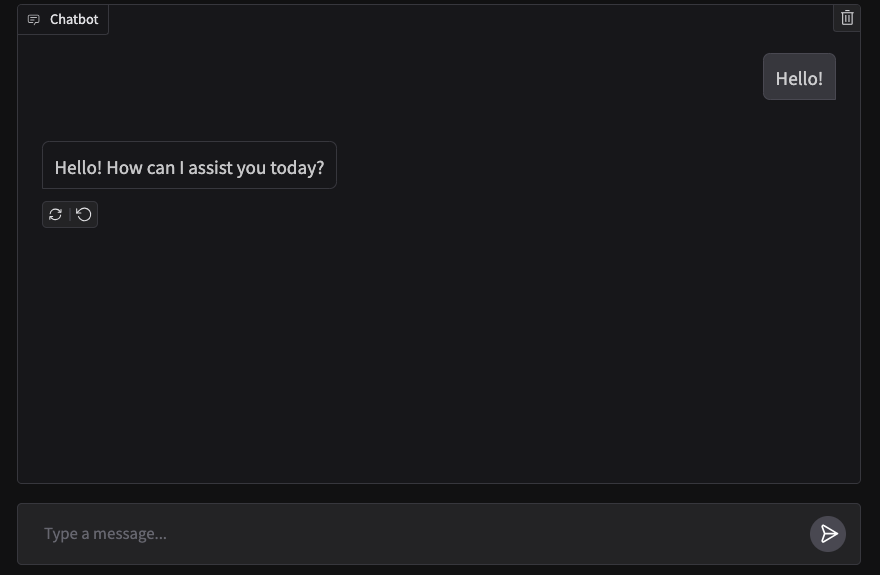
4. Building a Chatbot with gr.ChatInterface
Gradio excels at creating chatbots. The gr.ChatInterface is a high-level abstraction that creates a complete chatbot UI from a single function.
Your function must accept two arguments: message and history. history maintains the conversation state.
Let's create a simple chatbot.
import openai

def openai_chatbot(message, history):
    messages = []
    # Convert history to OpenAI chat format
    for user, assistant in history:
        messages.append({"role": "user", "content": user})
        messages.append({"role": "assistant", "content": assistant})
    messages.append({"role": "user", "content": message})
    try:
        client = openai.OpenAI(api_key=openai_api_key)
        response = client.chat.completions.create(
            model="gpt-4o-mini",
            messages=messages,
            stream=True
        )
        partial = ""
        for chunk in response:
            delta = chunk.choices[0].delta.content or ""
            partial += delta
            yield partial
    except Exception as e:
        yield f"[Error] {str(e)}"

demo = gr.ChatInterface(
    fn=openai_chatbot,
    title="OpenAI GPT-4o-mini Chatbot",
    description="A chatbot powered by OpenAI's GPT-4o-mini model.",
    examples=["Hello!", "What is Gradio?", "Tell me a joke."]
)

demo.launch()
/Users/devon/.pyenv/versions/3.10.14/lib/python3.10/site-packages/gradio/chat_interface.py:345: UserWarning: The 'tuples' format for chatbot messages is deprecated and will be removed in a future version of Gradio. Please set type='messages' instead, which uses openai-style 'role' and 'content' keys. self.chatbot = Chatbot(
* Running on local URL:  http://127.0.0.1:7869
* To create a public link, set `share=True` in `launch()`.
5. Sharing Your App
One of Gradio's most powerful features is its ability to create a public, shareable link for your app. This allows anyone to try your demo from their browser, while the code runs on your machine (or wherever you are running the script).
To enable this, just add share=True to the launch() method.
Note: The link is temporary (usually lasts for 72 hours) and provides a direct tunnel to your local server. Only share it with people you trust.
# This is a non-blocking cell to show the syntax.
# To run it, you would call demo.launch(share=True)
# For example:
#
# def hello(name):
#    return f"Hi {name}!"
#
# demo = gr.Interface(fn=hello, inputs="text", outputs="text")
# demo.launch(share=True) # This will generate a public URL like https://....gradio.live
Notebook Summary
This notebook is a hands-on tutorial for building interactive web apps with Gradio, a Python library for rapid prototyping of machine learning demos and chatbots. It covers:
- Setup: Installing Gradio and loading API keys securely.
- gr.Interface: Creating simple UIs for Python functions.
- Multiple Inputs/Outputs: Handling functions with several arguments and return values.
- gr.Blocks: Building custom layouts and multi-tab apps.
- gr.ChatInterface: Building a chatbot UI, including integration with OpenAI's GPT-4o-mini model.
- Web & Public Sharing: How to access your app in the browser and share it with others.
By the end, you'll know how to:
- Build and launch Gradio apps from a notebook or as a web app
- Connect to real LLMs (OpenAI, Hugging Face, etc.)
- Share your interactive demos with others easily